Hot Tags
Automotive Paint Protection Film Installation: A Step-by-Step Guide for Flawless Results
March 10, 2026


Automotive Paint Protection Film Installation has become a more important topic as vehicle owners place greater value on surface preservation, visual quality, and long-term finish care. The category itself continues to expand.
At HEY FILM, we view installation as more than a workshop procedure. It is the stage where product design, adhesive control, film clarity, and installer skill must work together. Even a high-grade film can underperform if surface preparation is incomplete or if tension is not managed correctly. By contrast, a disciplined process helps deliver the clean finish clients expect from premium protection programs.
Why Automotive Paint Protection Film Installation Requires Process Control
A quality film is designed to protect painted panels from stone chips, light scratches, bug residue, road tar, stains, and outdoor exposure. Technical documentation from 3M describes paint protection film as a barrier against exactly these forms of everyday damage, which helps explain why installation quality directly affects customer satisfaction.
This is also why professional buyers should not treat all films as interchangeable. In practical terms, Automotive Paint Protection Film Installation depends on three linked factors: film construction, adhesive behavior, and installation discipline. At HEY FILM, we focus on TPU-based solutions with optical clarity, stable top-coat performance, and the flexibility needed for complex vehicle surfaces. These product characteristics matter because modern bumpers, mirrors, and hood contours leave little room for error.
A flawless result is rarely created by speed alone. It comes from correct panel preparation, proper solution balance, controlled stretching, and careful edge finishing.
Step 1: Inspect the Vehicle and Prepare the Surface
The installation process begins long before the liner is removed. The vehicle must be inspected panel by panel to identify chips, repaint history, wax residues, edge contamination, and trapped debris. This stage is essential because the film will not hide poor surface conditions. It will often make them more visible.
For repainted vehicles, caution is necessary. 3M notes that installers commonly wait at least 30 days before applying film to repainted surfaces, while the final decision should follow the paint supplier's curing recommendations.
Essential preparation points include:
✓ Wash the vehicle in detail to remove surface road film and loose contamination.
✓ Decontaminate all painted areas to avoid leaving embedded particles beneath the film.
✓ Pay special attention to edges, corners, and seams, since Avery Dennison specifically advises that these critical areas must be thoroughly cleaned and dried before application.
✓ Confirm that the paint is fully cured and stable before installation on any repaired panel.
The quality of the final result is often defined at this stage, whether it appears high-end or defective. Many installation defects blamed on film quality actually begin with incomplete cleaning.
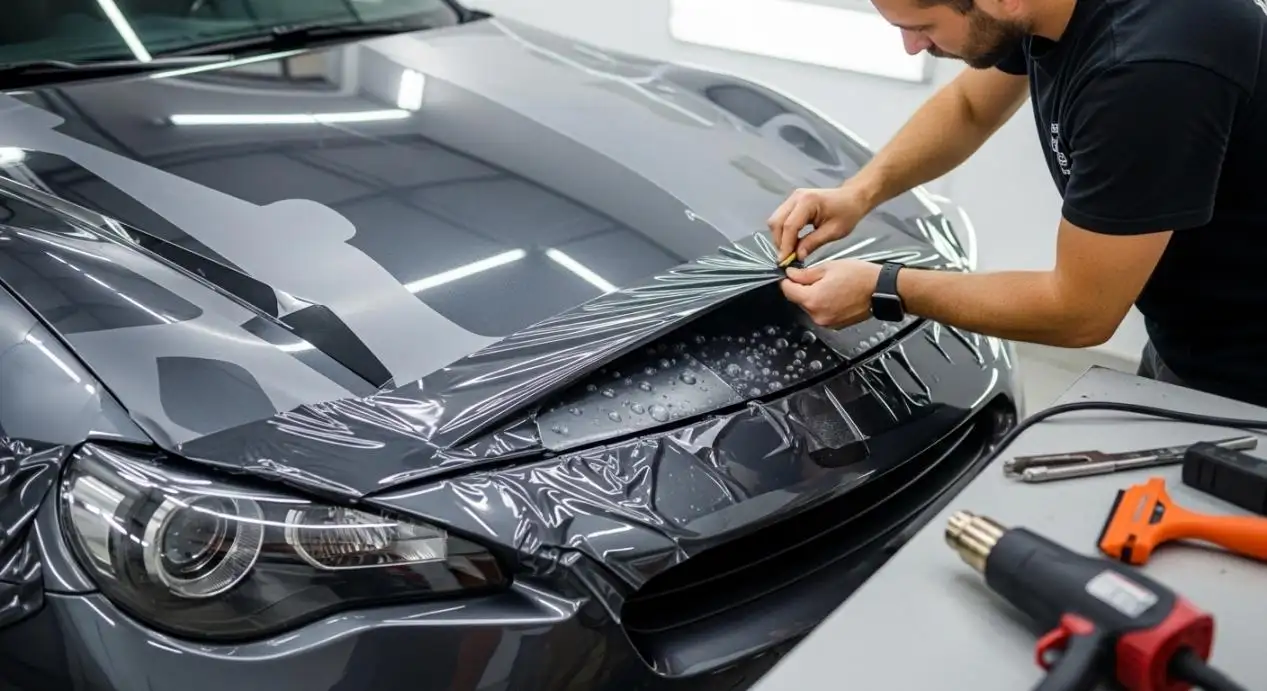
Step 2: Control Temperature, Slip, and Tack Before Positioning
Once the surface is ready, the next step is environmental control. 3M states that optimal application for paint protection film on the vehicle is around 70°F to 79°F (21°C to 26°C), and its FAQ also lists a broader recommended ambient range of 60°F to 85°F (16°C to 30°C).
Temperature matters because adhesive response, film conformability, and solution evaporation all change with workshop conditions. A film that behaves well in a controlled bay may respond very differently in an overheated or cold environment.
3M installation guidance also recommends a mild slip solution based on 2 ml of non-detergent slip agent per 32 ounces of water, with ratio adjustment depending on conditions. This is a useful benchmark because the correct solution balance helps the installer position the film without losing control of initial tack.
At HEY FILM, we recommend a methodical approach rather than aggressive handling. The goal is to float the film into place, align it with the panel geometry, and then gradually shift from positioning to anchoring. This improves consistency and reduces unnecessary tension marks.
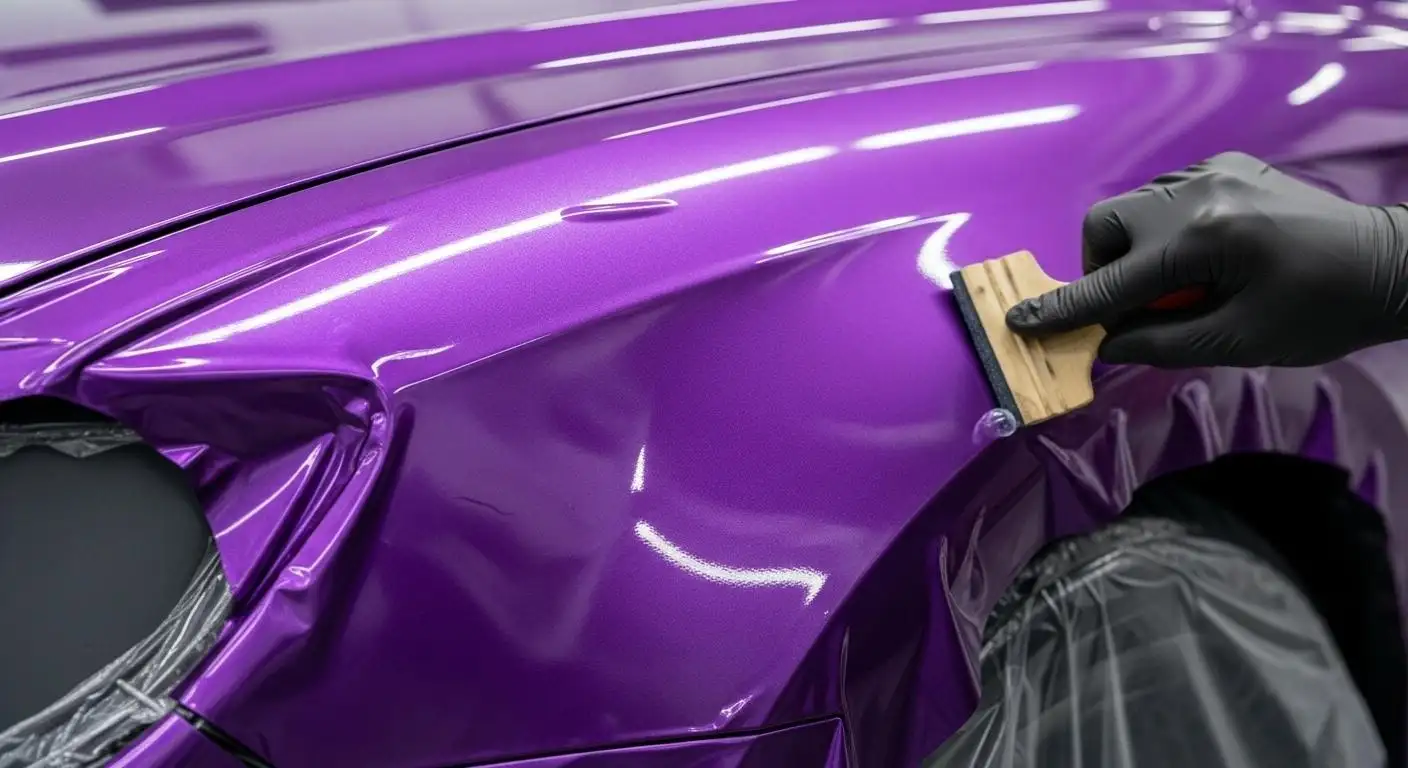
Step 3: Lay the Film, Manage Tension, and Finish the Edges
This is the stage most clients notice, because it determines whether the result looks seamless. During Automotive Paint Protection Film Installation, the film should be laid with deliberate tension control. Overstretching can affect long-term stability. 3M's FAQ states that installers are recommended not to stretch the film more than 15% during a bulk installation.
Large flat panels are usually more forgiving. Curved areas are not. Front bumpers, mirror caps, wheel arches, and recessed sections require careful sequencing so the film conforms without whitening, distortion, or edge stress.
A disciplined technician will generally:
✓ anchor the film in a stable reference area first
✓ work solution outward in controlled passes
✓ use heat carefully where shaping support is needed
✓ check wrapped edges and corners before final release
For long-term durability, edge work matters as much as surface appearance. Clean, dry, well-set edges reduce the risk of lifting and help preserve the visual integrity of the installation.
Step 4: Check the Finish and Guide the Client on Aftercare
The job is not complete when the panel looks clear under shop lighting. A proper final inspection should confirm alignment, moisture release, edge condition, and visual uniformity across adjacent panels. Some minor haze or moisture pockets may settle during the normal curing phase, but the delivery standard should still be clean and controlled.
Client aftercare is equally important. XPEL suggests delaying vehicle washing for 48 hours following installation, whereas 3M recommends waiting at least 72 hours and prefers either hand washing or a touchless wash approach. 3M also advises using a wet, non-abrasive, solvent-free cleaner with a pH between 6 and 8 for ongoing maintenance.
These guidelines are commercially useful because proper aftercare protects both film performance and installer reputation.
Why HEY FILM Supports Better Automotive Paint Protection Film Installation
At HEY FILM, we believe the best installation outcomes come from the right match between material design and application practice. Clients do not only need a film roll. They need a product with stable handling, strong clarity, reliable top-coat behavior, and support that helps installers achieve repeatable results on real vehicles.
That is where a manufacturing partner adds value. We support clients with product information, installation-focused thinking, and film solutions developed for practical use across hoods, fenders, bumpers, mirrors, and full-body programs. As demand rises in the global market, the expectation is no longer basic protection alone. Buyers increasingly expect a finish that looks refined, lasts well, and reflects professional standards.
CTA: If your business is evaluating a new supplier or planning to expand its protection film line, contact HEY FILM to discuss film structure, application needs, and product support for high-quality Automotive Paint Protection Film Installation projects.